hpc4you_toolkit v3
It is the v2 + the Web Interfaces. The Web Interface are for:
- User/Group Portal, powered by OpenLDAP, –> for HPC Administrator
- Resources Portal, powered by ColdFront, –> for HPC Administrator
- HPC User Portal, powered by Open OnDemand, –> for HPC User. You can play with Linux Desktop in the Web.
In a word, v3 features parallel computing cluster with web front-end.
hpc4you_toolkit v2
The hpc4you_toolkit is a simple but robust toolkit written by a computational chemist to set up a parallel computing cluster for scientific research.
No computer skills or Linux knowledge are needed. Only copy and paste the cmd from the screen then press the Enter key.
If you have some knowledge of how parallel computing clusters work, and how to administrate Linux in the cmd line and configure Linux networking, then you can try out the OpenHPC solution.
Currently, the hpc4you_toolkit supports:
- RHEL7, RHEL8, RHEL9 and their compatible operating systems, such as CentOS 7.x, CentOS 8.x, RockyLinux 8.x, AlmaLinux 8.x, AlmaLinux 9.x, CentOS Stream 9.
- Ubuntu 20.04/22.04 and their compatible operating systems.
- The maximum number of computing nodes depends on the capacity of your switch.
- You should configure a functional repository first.
Quick Start
- Get the package.
- Edit /etc/hosts file.
- Upload the package hpc4you_toolkit-XXX.zip.
- Run the cmd
unzip -qo hpc4you*.zip; source code.
All subsequent 5 commands will be automatically displayed in green.
All you need to do is to copy and paste the green text according to the on-screen instructions.

Prerequisites
- All servers running the same version of Linux.
- All servers are interconnected through a LAN, 1000 Mbps, or 10 Gbps ethernet, or may be InfiniBand.
- The yum/dnf/apt is working on all servers.
- All servers have a unique hostname.
- All servers share the same root password.
- The hostname of login node should only be master or the alias must be master if you have set the hostname to something else.
- The hostname of all computing nodes should only be nodeXX or the alias must be nodeXX if you have set the hostname to something else.
Get hpc4you_toolkit
Choose one machine as the management/master/login node, and run the following code,
curl https://raw.githubusercontent.com/hpc4you/hpc/main/getInfo.sh | bash
Follow the on-screen prompts carefully.
Remeber to copy and paste the blue lines into the body of your Email, please also attach the XXX.dat file with the Email.
Cluster Architectures
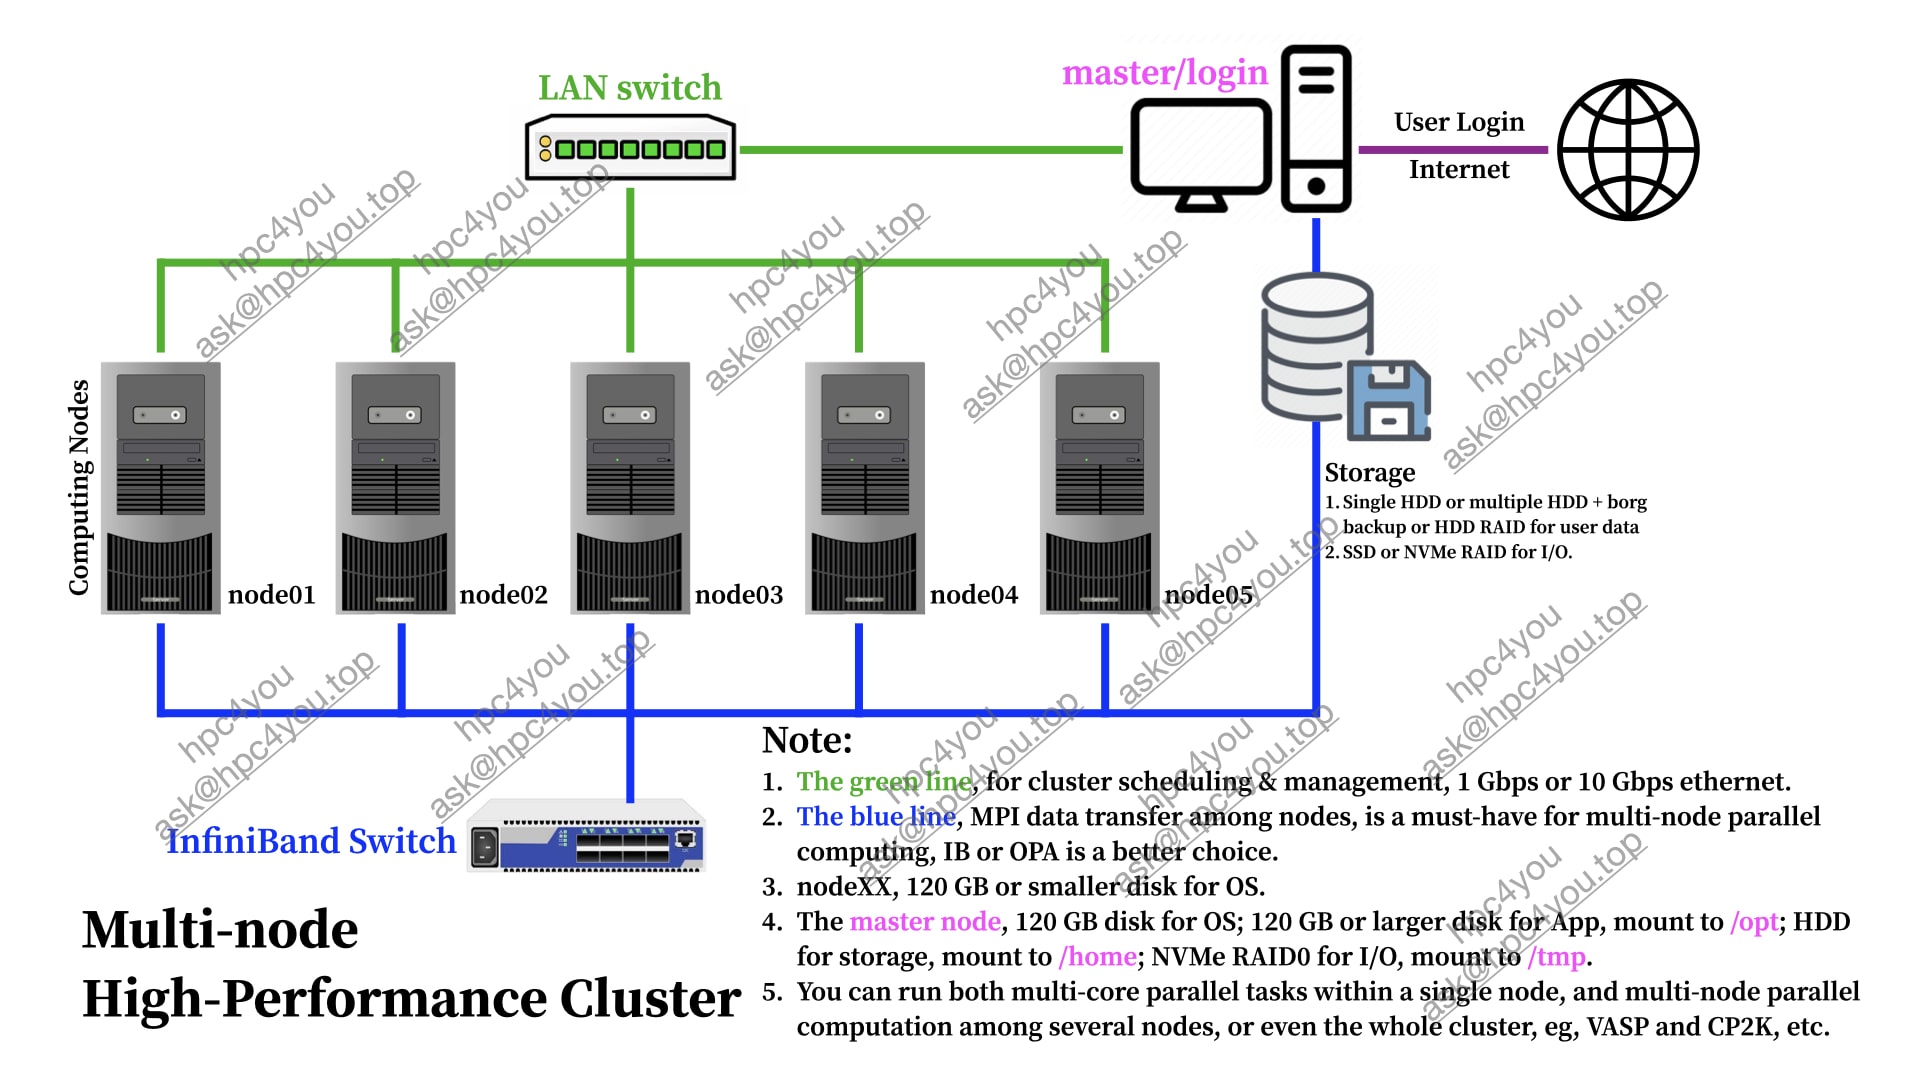
High-Performance Cluster
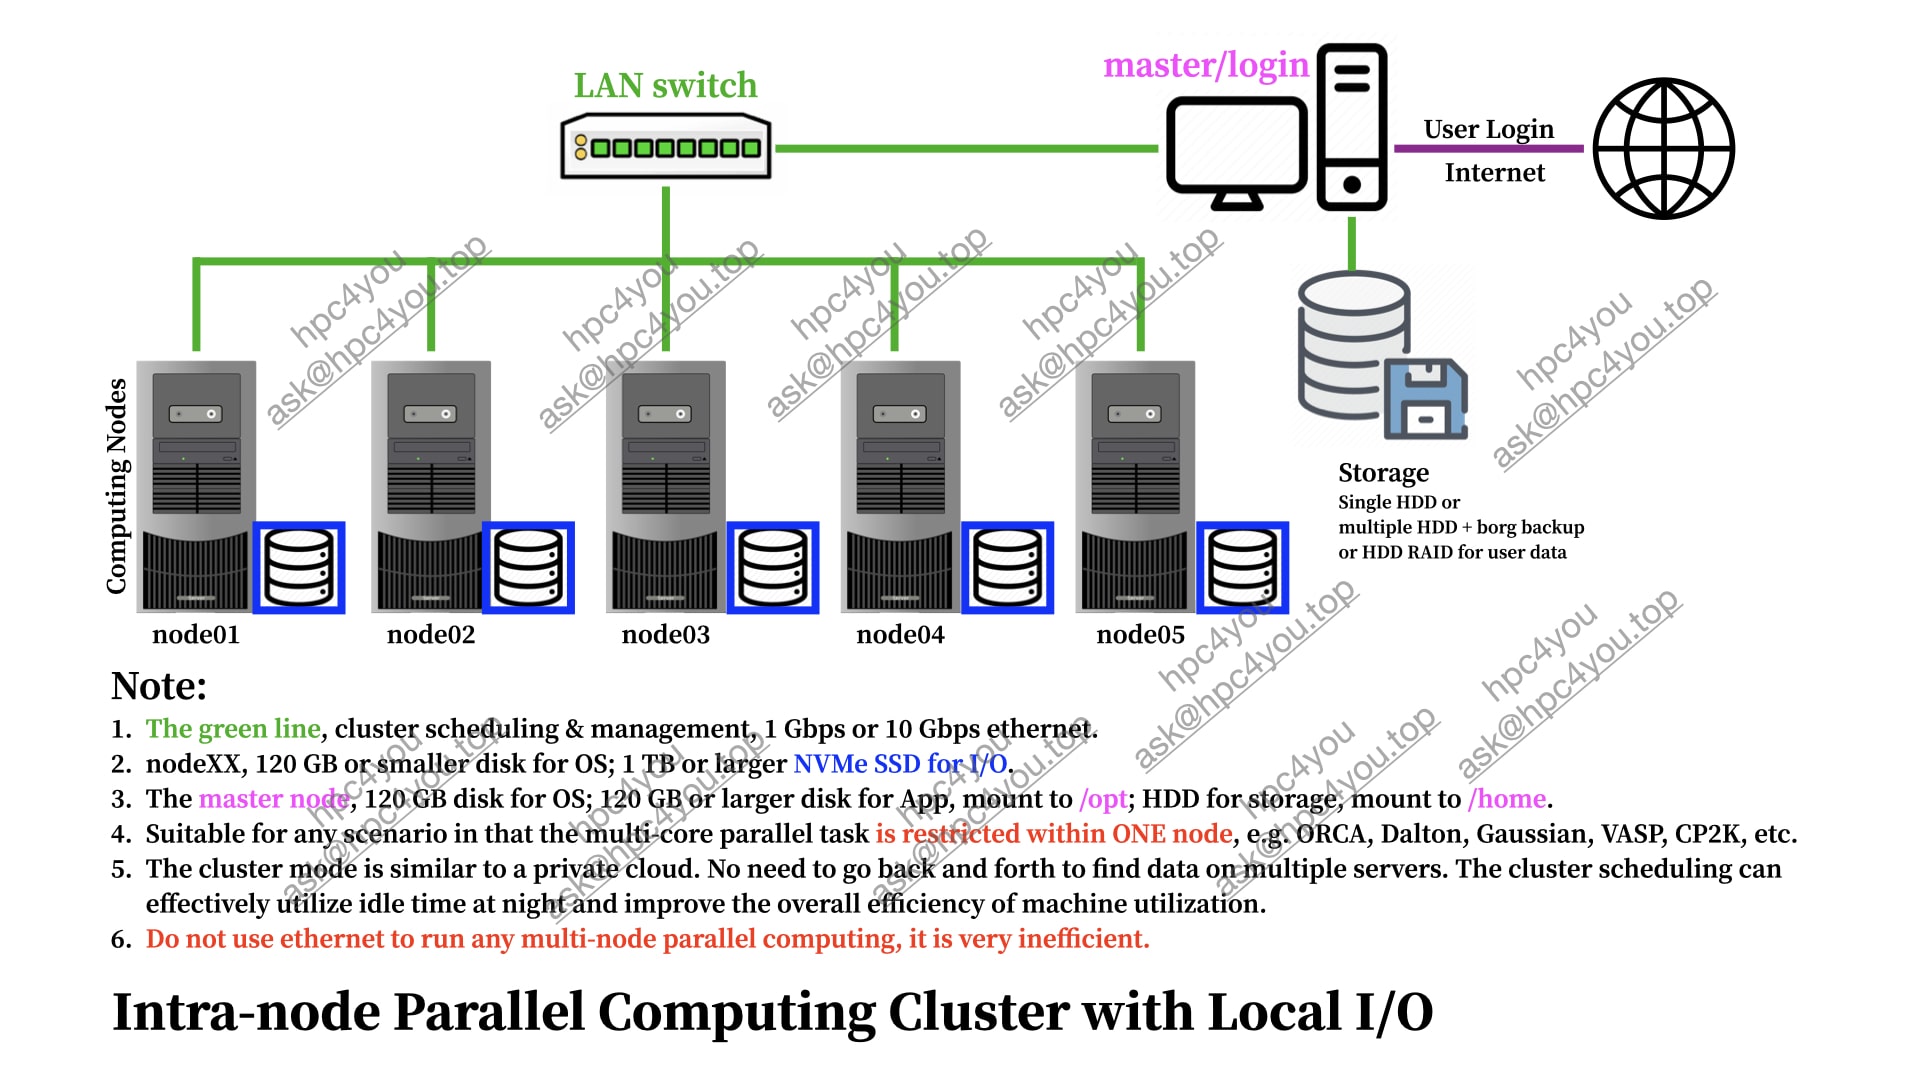
Intra-node Local-I/O Cluster
mini-HPC

Declare Servers | v2
On the login node, edit file /etc/hosts.
Scenario A
If you have configured the hostname for master/login node to master, and configured the hostname of computing/slave nodes to nodeXX, the content of the file /etc/hosts should be similar to the following.
### the IP and the corresponding real hostname
192.168.1.100 master
192.168.1.101 node1
192.168.1.102 node2
192.168.1.112 node12
Scenario B
If the hostname of the login/master node is not master, and/or the hostname of any computing/slave node is not nodeXX, the content of the file /etc/hosts should be similar to the following.
# the IP and real hostname
192.168.1.100 server0
192.168.1.101 server1
192.168.1.102 server2
192.168.1.112 server12

### the IP and the corresponding alias hostname
192.168.1.100 master
192.168.1.101 node1
192.168.1.102 node2
192.168.1.112 node12
In this example,
- server0 is the output of
hostnameon the login node. - server12, is the output of
hostnameon the computing node which can be accessed via IP 192.168.1.112. - The hostname of all compute nodes must be prefixed with node, and the the suffix numbers (‘0’, ‘1’, ‘2’, and ‘12’ in current case) do not have to be consecutive.
- You can use
nmtuito set hostname and configure the IP address.
Declare Servers | v3
In v3, the default hostname still follows the master/nodeXX pattern.
You’d better follow this nomenclature.
It is possible to customize the machine name using the methods described above. After customizing the hostname, you may need to refer to the Open OnDemand manual (https://osc.github.io/ood-documentation/release-3.0/index.html) to make the necessary configuration changes.
Run hpc4you_toolkit
Upload the package hpc4you_toolkit-XXX.zip to the login node.
SSh into the login node, run:
unzip -qo hpc4you*.zip; source code
Follow the on-screen prompts carefully.
You will be asked to copy and paste ./step1.sh into the current terminal. Please just do it.
Please wait a while (The waiting time depends on the network bandwidth), you would read on the screen,
Default root password for all slave nodes
Please type the root password, then press the Enter key.
Nothing to do but wait …
Copy and paste the green line, then press the Enter key, and wait …
All servers will automatically reboot at least twice, and then the slurm scheduling cluster is ready for you.
In particular, the restart operation of all compute nodes will be 1 minute lag behind the master node.
Nothing else to do, just wait.
By default, the /opt and /home from the master/login node are shared among all slave nodes. It is possible to add new share path by,
- Edit /etc/exports file on master/login node,
- Use ‘setup_hpc –sync_do’ to update the /etc/fstab file on all slave nodes.
User Management | v2
Add user
On login node, run
useradd_hpc tom
this will add user tom to the default group users.
useradd_hpc chem tom
this will add user tom to the group chem.
Caution:
- You will be prompted to set a password for the new user. You will need to enter the password twice. But the screen does not show any asterisks.
- Be sure to copy the private key if you have enabled enhance_security.sh module.
- If you have slurm accounting enabled, you should also run,
sacctmgr add user tom Account=hpc4youin which, you will give user tom the default account hpc4you. Refer slurm manual for more details.
Delete user
On the login/master node, run,
userdel_hpc tom
in this case, user tom is to be deleted.
Cluster Management | v2 and v3
Power on
Power on the master node and all switches first, and then power on all computing nodes.
Power off
On the login/master node, run, poweroff_hpc.
Reboot
On the login/master node, run, reboot_hpc.
Add new node
There are two approaches available.
Approach A | manually
- Clone the OS disk of any compute node. Use this hardware tool, Offline Cloning Tool.
- Boot the new server with the cloned disk, modify hostname and configure network with command
nmtui. - Add the IP and hostname of the new server to /etc/hosts on the master/login node.
- On the master/login node, run
setup_hpc ‐‐sync_file /etc/hosts. - On the new server, run
slurmd ‐C | head -n 1, please copy the output. - On the master/login node, paste the coppied contents into last line of file /etc/slurm/slurm.conf.
- On the master/login node, run
setup_hpc ‐‐sync_do 'systemctl restart slurmd'; systemctl restart slurmctld. - Done.
Approach B | automatically
- Install the OS for the new node.
- Configure the network.
- On the master/login node, run
addNewComputeNode.sh. - You will be promoted to enter the IP address and root password for the new machine, and give the new machine a name in the format nodeXX.
- Wait…Done.
Better Security
- Disable internet connection on all slave/computing nodes.
- On login/master node, run
passwdto change the root password, then runsetup_hpc --sync_user. - Disable password login for root user, only key authentication is allowed.
- Or use ssh ProxyJump server or even hardware firewall.
- Or run
enhance_security.shto apply awesome security hardening configurations automatically. (v2 only)
Usage of setup_hpc
sync file
On the login/master node, run
setup_hpc --sync_file /full/path/to/file
For example, setup_hpc --sync_file /etc/hosts will sync the hosts file on master node to all slave nodes.
run cmd
On the login/master node, run
setup_hpc --sync_do cmd
For example,
setup_hpc --sync_do uptime
will print the uptime info for all slave nodes.
setup_hpc --sync_do 'systemctl restart slurmd; utpdate -u 3.cn.pool.ntp.org'
will restart slurm client and sync time on all slave nodes.
hpc4you_toolkit solo
hpc4you_toolkit solo, is also available, which can deploy slurm to workstations by only run source code.
Pricing
hpc4you_toolkit features
| FEATURES | Basic | Adv | Pro |
|---|---|---|---|
| CPU Scheduling | ✅ | ✅ | ✅ |
| GPU Scheduling1 | ✅ | ✅ | ✅ |
| Job Log | ❌ | ✅ | ✅ |
| User Control2 | ❌ | ❌ | ✅ |
| Monitoring Historical | ❌ | ❌ | ✅ |
| Monitoring Realtime | ❌ | ❌ | ✅ |
| Security & OS Optimize3 | ❌ | ❌ | ✅ |
| Pricing | 399 USD | Email ask@hpc4you.top | Email ask@hpc4you.top |
hpc4you_toolkit solo features
| FEATURES | Basic | Adv |
|---|---|---|
| CPU Scheduling | ✅ | ✅ |
| GPU Scheduling | ✅ | ✅ |
| Job Log | ❌ | ✅ |
| Pricing | 99 USD | 149 USD |
Discount
- A huge discount of up to 75% OFF is available if you choose the self-service mode.
- The self-service mode refers to ‘Read the manual, watch the video tutorials, and do it all by yourself. No support is available’.
- 中文用户🔗点击这里.
Demo
Live Demo
Real-time demo on how to set up HPC for scientific research with hpc4you_toolkit. Only copy and paste. No computer skills and Linux knowledge are required.
- All modules, 🔗live-demo with Ubuntu Jammy
- All modules, 🔗live-demo with Ubuntu Focal
- All modules, 🔗live-demo with CentOS 7.9
- All modules, 🔗live-demo with RockyLinux 8
Short Videos
To those who have no patience to watch real-time videos,
- copy+paste+Enter -> cluster ready, demonstration of hpc4you_toolkit 🔗BV1GY411w7ZV 🔗YouTube Link
- Deploy SLURM by only run
source code, demonstration of hpc4you_toolkit solo 🔗BV1Gg411R7tt
Play with Linux
- How to add new IP and hostname informations into file /etc/hosts? 🔗bv19A4y1U7uX
- How to upload file(s) to remote Linux server? 🔗BV1fJ411n7uV
- Change hostname 🔗BV1yP4y1M77H
- Configure network 🔗BV1gP4y1u7Aw
Terminology
In the field of parallel computing clusters, we refer to a server as a node.
Usually, in small-scale clusters, the login server, storage node, and the contollor server can be merged into a single server, which is called as the login/master node. Accordingly, we refer to all compute nodes, as the slave nodes.
-
SLURM natively supports GPU scheduling. However, the auto-detection mode often fails and needs to be configured manually once. If you can’t do it, I can be a helping hand, but please pay the fee. ↩
-
To prevent users from sshing into nodes that they do not have a running job on, and to track the ssh connection and any other spawned processes for accounting and to ensure complete job cleanup when the job is completed. More info ↩
-
Reference, https://github.com/decalage2/awesome-security-hardening ↩